The Repel Dungeon, was an underground 'dungeon' area in Blood Omen: Legacy of Kain which contained the Repel spell. Situated in a the cellars beneath two fairly unremarkable houses in Coorhagen, the dungeon was visited by Kain in the early chapters of Blood Omen. Notably the Dungeon incurred significant changes in the course of development, including the reshuffling of its contents.
Profile[]

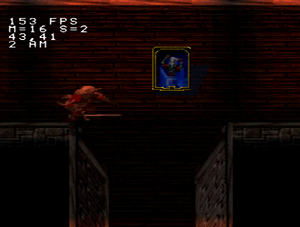
The Repel Dungeon entrance (right) and exit (left) above ground
The Repel Dungeon was a spell dungeon that appeared in the early stages of Blood Omen: Legacy of Kain and first appeared in the chapter "The Hunt for Malek" as Kain made his way north toward Malek's Bastion passing through his former Plague-infested home of Coorhagen. The Dungeon itself was a series of underground passages linking a pair of fairly unremarkable houses in central Coorhagen.[Blood Omen][Blood Omen/4]
As Kain passed through Coorhagen he found the streets filled with the bodies of victims of the plague and many streets blocked or otherwise impassable, necessitating the use of sewers and dungeons to get through the city. When he reached the center of Coorhagen Kain found a house which led to the Repel dungeon within.[Blood Omen][Blood Omen/4][Blood Omen strategy guide]
Notably the construction led Kain through a low trail through a distinctive two-tiered room before looping back to the balconies of the chamber where Kain could collect the Repel Spell on the top level before exiting. Kain's passage through the upper level of the dungeon was marked by a number of Shooters and Liches - ultimately encouraging testing the use of the spell before leaving.[Blood Omen][Blood Omen/4][Blood Omen strategy guide]
Design and Layout[]
Externally the appearance of the Repel Dungeon was that of a pair of regular houses in central Coorhagen, with similar design cues like the apparent wattle and daub construction. The entrance to the dungeon consisted of a larger apparently two tiered house, while the exit was represented by a small single level property slightly to the west of the entrance. Internally the rooms of the dungeon initially appeared to resemble internal house areas before changing to a similar aesthetic to sewers and other underground dungeon area.[Blood Omen][Blood Omen/4][Blood Omen strategy guide]
The first area of the dungeon consisted of a rectangular room containing a Save altar, with the mural of the Repel spell positioned in front of it. A closed door was positioned at the back of the room and two doors were positioned at the side of the room with the right door barred and the left leading onto the next area. Notably this room followed the construction from outside, suggesting it was inside the first house.[Blood Omen][Blood Omen/4][Blood Omen strategy guide]


The next chamber was a single passage which turned and headed northward toward another arched wooden doorway with a peasant swordsman and a man at arms patrolling the corridor, which was flanked by Shooters. The passage notably changed to a green walled wooden arch aesthetic suggesting it may have been underground.[Blood Omen][Blood Omen/4][Blood Omen strategy guide]
The next room was a large double-tiered room which Kain entered at the bottom level, with an upper level balcony visible going around the outside of the top of the chamber. Kain entered into a small square room in the bottom left corner which was populated by another man at arms and a pair of peasant swordsmen. Progressing forward through the wooden arch led to a narrower corridor which turned and headed east, passing a blue magic sphere and a heart of darkness artifact and was populated by two knife throwers, two peasant swordsmen and two men-at-arms. At the end of the passage the corridor again turned south where a pair of knife throwers awaited before narrowing and expanding into another small square chamber. Here two more peasant swordsmen, two knife throwers and two men-at-arms ambushed before Kain could reach the bottom archway to progress to the next area. Notably the two-tiered area had the green sewer like aesthetic on the bottom level, but a brighter maroon-red brick and wooden flooring on the level above - which was as yet inaccessible.[Blood Omen][Blood Omen/4][Blood Omen strategy guide]
The next area was a small square area with green walls and wooden arch doorways on the north and south walls, with a shooter on each side wall, an Energy Bank in the top-right corner and a pair of men-at-arms patrolling the room. The bottom arch led down to another slightly larger square room - this too had a pair of men-at-arms and alternate walled shooters, but they were supplemented by two peasant swordsmen and a knife thrower. A blood vial was positioned in the center of the room and a wall button in the top-left corner opened the arched wooden door in the bottom wall - this returned Kain to the save altar chamber via the top doorway and now the right door was opened.[Blood Omen][Blood Omen/4][Blood Omen strategy guide]
Progressing through the right doorway immediately led into areas lined with maroon-red brick and wooden floors - and a ']'-shaped corridor with a number of shooters lining the walls and two Skeletons patrolling the corridor. A Flay and a purple magic sphere were positioned in the bottom left and right respectively with an Implode in the middle of the top part of the corridor. A doorway in the western wall of the top part of the corridor led to the next room.[Blood Omen][Blood Omen/4][Blood Omen strategy guide]
This led back to the double-tiered room - this time on the top level - with Kain required to follow the balcony upward, westward along and top wall and then down to the far side of the room while a number of Shooters and Liches fired projectiles at him. Chained humans could be found on the walls in the top-middle, top-left and middle-left of the chamber, while an implode could be found by the entrance on the mid-right, a Font of Putrescence could be found in the top-middle and a Rune triangle could be found in the top-left. From the center of right wall the balcony crossed over the top of the left archway to reach a balcony in the center of the room where two liches guarded a blue magic sphere, a rune triangle and the Repel spell itself. A short passageway behind led south to another doorway and the exit to the room.[Blood Omen][Blood Omen/4][Blood Omen strategy guide]
The next area was a smaller set of corridors, the first room of which was populated by liches and shooters and led south before turning to the west a leading to another southern door, passing a blue magic sphere on the way. The doorway led into another square room - this one with a shooter on each side wall and a liche and two skeletons protecting the room. A Wall button in the top-left opened a southern door which led to the next area.[Blood Omen][Blood Omen/4][Blood Omen strategy guide]
The final area consisted simply of a square-rectangular room with piles of Plague bodies in the top-left and bottom right and a door in the south which exited the dungeon - the return on the outer theming also suggested this area was directly inside the exit house.[Blood Omen][Blood Omen/4][Blood Omen strategy guide]
Behind the scenes[]
The Repel Dungeon was one of the areas in the game that was known to have undergone significant changes during development. The Repel Dungeon as it appears in the final game was not originally used to house the Repel spell but was used in the Blood Omen: Legacy of Kain alpha as a dungeon for two deleted spells Force Shield and Magic Absorb - with an entirely different Repel Dungeon present later in the alpha. By the time of the Blood Omen: Legacy of Kain beta, the original Repel Dungeon had been removed along with the cut spells, and the Repel spell was now placed in the dungeon they previously occupied with some minor modifications to its structure. Entries found in a second Developers' level select in the alpha could suggest that there were originally three separate dungeons for Force Shield, Magic Absorb and Repel which were gradually consolidated.[Blood Omen][1][2][3][4][5]
The Force Shield/Magic Absorb Dungeon[]
Like the final Repel Dungeon in the retail version, the Force Shield/Magic Absorb dungeon is placed in the same two buildings in Coorhagen and its internal layout and design closely matches the overall layout and design of the retail Repel dungeon, although there are a number of minor changes, reshuffles and alterations. The lighting of the areas is also drastically changed and few power-ups are seen beyond the main spells.[Blood Omen][1][4]
Layout & Differences[]


Notably the first room seen in the alpha version is actually closer to the design of the last room of the retail version - being a room obviously inside a building containing as number of plague ridden corpses. The room in the alpha notably has corpses scattered around the room rather than in piles and rows of beds on either side of the room. A doorway in the north led onto the next area.[Blood Omen][1][4]
The next area Kain entered was more comparable to the initial save altar room of the retail version - except that the room was a different environment - being a square cavern with the floor murals of both spells in the center and the save altar occupying an extended alcove in the top-right corner. An open cavern doorway in the right wall led to the next area.[Blood Omen][1][4]
The following corridor map area was effectively combined with the later 'two-square' area meaning that Kain progresses then revisits that tile, although the layout to the player would be the same thing. The most notable difference being the enemies attacking being three peasant swordsmen rather than a swordsmen and a man-at-arms.[Blood Omen][1][4]
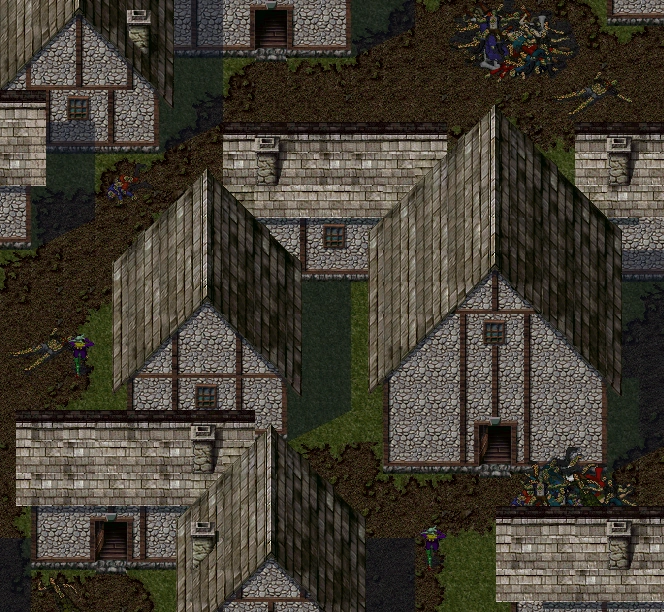
The bottom of the double-tiered room r was next with only minor changes visible such as rafters appearing in the alphas version and the doorways being more square and open than the wooden arched design of the retail version. Notably this section featured the Force Shield spell card, appearing at the start of the top-east-heading corridor. The number of enemies in the area was higher too (with some variety changes) - necessitating the use of the spell.[Blood Omen][1][4]
The Force Shield card
The two-square area - as mentioned previously - was now in the same map area as the initial corridor. Again the layout remained the same but the amount of shooters was increased and the enemies present were City guards rather than men-at-arms.[Blood Omen][1][4]
Rather than returning to the initial cave area, Kain came back to another similar cave area with two floor murals that was lacking the initial save altar. Two large doors were positioned in the north and eastern walls with Kain emerging from the north and heading though to the eastern one (in the same manner as the retail game).[Blood Omen][1][4]
Like the first corridor of the dungeon the next area was also bundled with another in the alpha, this time with the final corridors - although again this was not as immediately apparent to the player. The main difference again was the increased enemies over the retail with four skeletons appearing in the ']' corridor and a different style of red Shooters.[Blood Omen][1][4]
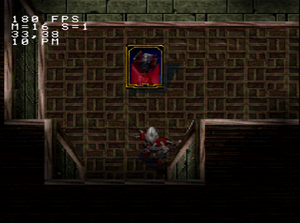
The Magic Absorb Card
The next area was the top of the two-tiered area - Like the retail this was treated as a separate area from the bottom tier - meaning only the top area was loaded and bottom-level features like the new rafters and lower enemies were missing. like in the previous area shooters were a different style and color - although interestingly they were less numerous than both the retail version and from what had appeared when viewed from the lower level. Enemies were also re-positioned and prisoners were missing. In the center of the bottom balcony the spell card for Magic Absorb in the same place Repel occupied in the retail.[Blood Omen][1][4]
The next area again returned to a bundle room to represent the 'escape' corridors. In contrast to the reverse 'L'-shape in the retail version the first room was just a straight corridor run through six shooters. The next room was the more familiar square shape but featured two skeletons and four liches instead of the lower amount featured in the retail - although no shooters were present in this room.[Blood Omen][1][4]
The dungeon then returned to a final cave - again this contained floor murals of both Force Shield and Magic Absorb - and Kain exited from a door in the north to a cave opening in the south.[Blood Omen][1][4]
The Original Repel Dungeon[]
The original Repel dungeon could only be found in the Blood Omen: Legacy of Kain alpha where it appeared much later in the game, featuring in a cave on the Eastern "Ruined Land" section of the map on the way to Dark Eden.[Blood Omen][1][5]
Layout[]


The first chamber inside the cave consisted of a square cavern with the Repel mural on the floor and the opening leading to the next area on the northern wall.[Blood Omen][1][5]
The next room changed the environment to green-walled dungeon aesthetic similar to the Bone Armor Dungeon. The chamber itself was a rectangular shape with a square raised balcony area in the top-left of the room containing an inactive teleporter accessible via a staircase leading up from the floor of the chamber. The Repel mural was again featured on the floor toward the center of the lower room and the area was populated by two Dandy throwers and two scimitar swordsmen. A door at the back of the lower part led onto the next area.[Blood Omen][1][5]
The next area started on a small balcony area at the bottom of the screen overlooking a deep pit filled with murky water. A bridge led northward over the pit to a square balcony on the other side where a small staircase led upto a wider rectangular part populated by four Skeletons. A Heart of Darkness and a prisoner could be found on the eastern wall and another prisoner was placed in the top-left corner of the room while two Shooters were positioned on the northern wall - the exit door was on the western wall.[Blood Omen][1][5]
The next area consisted of a number of linked rectangular chambers. The bottom rectangular chamber a shooter on each side wall and was populated by two skeleton knights with two prisoners on the northern wall. A staircase led upto the next chamber overlooking the first, where three skeleton were positioned, with a shooter and a prisoner on each wall. A floor button was placed in the top-left corner of the room which opened the door in the north wall. Through the door Kain reached the final rectangular area which had two prisoners placed along the right hand wall. This chamber was dominated by a series of sequential spikes on the left side of the room with two shooters above preventing access across the room. At the left end of this was a line of Spike pits with a floor button at each of the north and south ends and two Liches who fired projectiles who fired projectiles from a balcony along the left wall of the room - activation of the switches opened the exit door on the northern wall of the right side which allowed Kain to progress to the next area.[Blood Omen][1][5]

The original Repel Card location
Broadly the next area was a wide corridor in a reversed 'C' shape. The passage led east from the first doorway before turning south and heading down a small staircase - at the top of the staircase was positioned the Repel spell card. At the bottom of the stairs the passage led south for a short way before turning back toward the west and heading to an exit door at the end of the passage. Five Shooters were positioned along the walls of the area and two prisoners were along the northern wall of each 'horizontal' section. In addition Liches inhabited the area at the top of the stairs and in front on the exit doorway.[Blood Omen][1][5]
The next area consisted of a deep pit filled with water with a number of high walkways, platforms and bridges crossing the area. Kain began on a small platform on the top of the western wall and could immediately press westward across a bridge to a square platform in the center of the room that was inhabited by four Dandy throwers with two Flays. Form here a narrow walkway led south to another square platform but it was patrolled by three Will-o-wisp and five skeletons. On the platform Kain could discover another two Flay before following another bridge to the west to another platform in the bottom-left of the room which contained three skeletons a wisp and a Flay artifact. A narrow walkway led northward to another square platform inhabited by four dandy throwers and containing another Flay. Finally a walkway led east before turning north to the last small platform where a couple of dandy throwers and a purple magic sphere awaited in front of the exit door leading to the next area.[Blood Omen][1][5]
The next area was a large square room with five square 'spaces' arranged in an 'X' pattern. The room was filled by numerous Shooters with on on almost every wall or junction. Eleven Liches were scattered around the room, again at 'junction' areas and corners. Flay artifacts could be found at the bottom-right and top-left corners of the room and Implodes could be found in the bottom-left and top-right corners. The exit door was in the top-center of the room, directly opposite the entrance.[Blood Omen][1][5]
The Final area of the dungeon again consisted of a deep pit filled with murky water with Kain on a high walkway above. The main walkway was wide and led directly north to a wide rectangular platform in the center of the room surrounded by fences. Four dandy throwers were positioned in the corners of the center platform along with two scimitar swordsmen at the front and a orange magic sphere. A teleporter in the center of the platform led to the teleporter at the start of the dungeon.[Blood Omen][1][5]
Notes[]
- As with most other dungeons, the Repel Dungeon is not named in game and it is only given a vague letter code in Blood Omen: Legacy of Kain—Official Game Secrets, the official guide to Blood Omen.[Blood Omen][Blood Omen strategy guide]
- The Coorhagen area outside the Repel Dungeon is grouped with other 'overland' locations under the "Map 0001" designation as "Map 0001 Sect 11". The interior areas of the Repel Dungeon are counted in files under the "Map 0016" designation with the rooms numbered as follows: "Map 0016 Sect 03" (or "M0001603") relating to the room with the initial save altar, "Map 0016 Sect 12" relating to the first corridor area, "Map 0016 Sect 01" relating to the bottom area of the main two tier room, "Map 0016 Sect 00" relating to the area with two square rooms, "Map 0016 Sect 13" relating to the ']'-shaped maroon corridors, "Map 0016 Sect 02" relating to the upper area of the main two-tiered room, "Map 0016 Sect 11" relating to the final liche corridors, and "Map 016 Sect 10" relating to the final corpse filled room.[Blood Omen][Blood Omen/4]
- When the Dungeon originally appeared in the Blood Omen: Legacy of Kain alpha as the Force Shield/Magic Absorb dungeon it was similarly positioned within Coorhagen - although the Coorhagen area itself appeared much further down the map at "Map 0001 Sect 31". The interior also had the "Map 0016" designation and within this many of the areas were the same or highly similar although some were reshuffled or rearranged as follows: "Map 0016 Sect 12" related to the initial bed filled room (the room was not in the retail version, although the designation was adopted for the first corridor), "Map 0016 Sect 10" related to the initial cave with the save altar (the initial save altar appeared in the retail at "Sect 12" although greatly changed; the "Sect 10" designation was adopted for the final corpse room which was absent in the alpha), "Map 016 Sect 00" related to the combined first corridor/two square room (in retail it represented just the two square room with the first corridor at "Sect 12"), "Map 0016 Sect 01" remains as bottom of the two tier area, "Map 0016 Sect 20" is the first of the two-mural transitional caves, "Map 0016 Sect 11" relates to the combined ']'-shape and liche corridors (in retail the code represented just the final liche corridors with the ']' room found at "Sect 13"), "Map 0016 Sect 02" remained as the upper area of the two tier room, and "Map 0016 Sect 21" related to the second (and final) of the two mural transitional caves.[Blood Omen][Blood Omen/4][1][4]
- The original Repel Dungeon seen in the Blood Omen: Legacy of Kain alpha was positioned in a cave on the Eastern "Ruined Land" section of the map that leads to Dark Eden. As with Coorhagen this area was slightly reshuffled and in the alpha it appears further down the map at "Map 0001 Sect 35" (it was "Sect 25" in the retail version). The interior area of the original dungeon has its own designation at "Map 0027", with the areas numbered as follows: "Map 0027 Sect 10" relates to the initial cave area with the Repel floor mural, "Map 0027 Sect 00" relates to the area with the floor mural and teleporter balcony, "Map 0027 Sect 01" relates to the first bridge area with murky water, "Map 0027 Sect 02" relates to the area with three rectangular rooms, "Map 0027 Sect 05" relates to the ']'-shaped corridor, "Map 0027 Sect 03" relates to the large bridge room with clear water beneath, "Map 0027 Sect 11" relates to the large 'crossfire shooters' room, and "Map 0027 Sect 04" relates to the final bridge area over murky water with the return teleporter. Ultimately The entire "Map 0027" designation was removed from later builds and the retail version.
- The Cave leading to the original Repel Dungeon is removed in the retail version, but a new cave filled with lava and containing a secret is added next to it. The path leading to the original dungeon is still visible but only leads to a tree which can be chopped down to reveal a plain cliff face. Notably the collision detection at this point allows Kain to walk up the cliff face a small distance as if there were still an entrance there.[Blood Omen][1][5]
- In both the final Repel Dungeon and the alpha Force Shield/Magic Absorb Dungeon the main two-tired room is counted as two separate map areas for each tier, with the bottom area counted as "Map0016 Sect01" and top as "Map0016 Sect02". Despite it appearing twice in sequence the save altar room in the retail version is still counted as the same area, appearing as "Map0016 Sect03" both times - only the doors that are unlocked change. This is not true of the caves with the with floor murals in the alpha which appear to be the same area with different doors unlocked but are actually different areas.[Blood Omen][Blood Omen/4][1][4]
- In the Developers' level select found in the retail version of the game has the Repel Dungeon listed in "OL3" under the somewhat unusual abbreviation "SH" - presumably related to its shield like nature. The discovery of the removed spells and reshuffled dungeons in the alpha somewhat explained the designation, with the the Force Shield/Magic Absorb dungeon originally listed under the abbreviation "SHAB" - referencing the spells found within. In the final version the new moved spell simply inherited a modified version of the designation for the previous spells. The original Repel Dungeon was also listed in the alpha level select under "OL5" using the code "REPL" - it is positioned as the first door in the area to the left of the Control Mind Dungeon. The door would ultimately remain in place in the retail version of the game but was inaccessible and unmarked. A second level select can be found in the alpha that has an extra entry "SHLD" before the "Lupo" along with a "SA?" entry in the place of "SHAB" and the other "REPL" door - potentially suggesting that seperate dungeons were originally planned for Magic Absorb, Force Shield and Repel with a deleted dungeon found somewhere around the Vasserbünde area.[Blood Omen][1][4][5][6]


Gallery[]
Tileset[]
")
")
")
")
")
")
")
")
")
")
")
")
")
")
")
Videos[]


See also[]
- Repel
- Coorhagen
- Force Shield
- Magic Absorb
 Alpha and Beta Versions (BO1) at The Lost Worlds (by Ben Lincoln).
- Force Shield and Magic Absorb Dungeon at The Lost Worlds (by Ben Lincoln).
- Force Shield at The Lost Worlds (by Ben Lincoln).
- Magic Absorb at The Lost Worlds (by Ben Lincoln).
- Original Repel Dungeon at The Lost Worlds (by Ben Lincoln).
References[]
- ↑ 1.00 1.01 1.02 1.03 1.04 1.05 1.06 1.07 1.08 1.09 1.10 1.11 1.12 1.13 1.14 1.15 1.16 1.17 1.18 1.19 1.20 1.21 1.22 1.23 1.24 Alpha and Beta Versions (BO1) at The Lost Worlds (by Ben Lincoln).
- ↑ Force Shield at The Lost Worlds (by Ben Lincoln).
- ↑ Magic Absorb at The Lost Worlds (by Ben Lincoln).
- ↑ 4.00 4.01 4.02 4.03 4.04 4.05 4.06 4.07 4.08 4.09 4.10 4.11 4.12 4.13 4.14 Force Shield and Magic Absorb Dungeon at The Lost Worlds (by Ben Lincoln).
- ↑ 5.00 5.01 5.02 5.03 5.04 5.05 5.06 5.07 5.08 5.09 5.10 5.11 Original Repel Dungeon at The Lost Worlds (by Ben Lincoln).
- ↑ Blood Omen Developers Level Select Page at The Lost Worlds (by Ben Lincoln).
Browse[]
| |||||||||||||||||||||||||||||||||||
| |||||||||||||||||||||||||||||||||||
| |||||||||||||||||||||||||||||||||||
| |||||||||||||||||||||||||||||||||||
| |||||||||||||||||||||||||||||||||||
| |||||||||||||||||||||||||||||||||||
| |||||||||||||||||||||||||||||||||||
| |||||||||||||||||||||||||||||||||||
| |||||||||||||||||||||||||||||||||||
| |||||||||||||||||||||||||||||||||||
| |||||||||||||||||||||||||||||||||||
| |||||||||||||||||||||||||||||||||||